前言
如果一组 Pod 对外提供服务(比如 HTTP),它们的 IP 很有可能发生变化,那么客户端如何找到并访问这个服务呢?
Kubernetes 给出的解决方案是 Service。
ps: 本文主要参考《每天5分钟玩转k8s》第六章
创建 service
常见 service 之前先准备好 deployment
- deployment.yaml
 apiVersion: apps/v1
 kind: Deployment
 metadata:
   name: test
 spec:
   replicas: 2
   selector:
     matchLabels:
       app.kubernetes.io/name: test
   template:
     metadata:
       labels:
         app: web
         app.kubernetes.io/name: test
     spec:
       containers:
         - name: front-end
           image: nginx
           imagePullPolicy: IfNotPresent
           ports:
             - containerPort: 80
- deployment2.yaml
 apiVersion: apps/v1
 kind: Deployment
 metadata:
   name: test2
 spec:
   replicas: 2
   selector:
     matchLabels:
       app.kubernetes.io/name: test
   template:
     metadata:
       labels:
         app: web
         app.kubernetes.io/name: test
     spec:
       containers:
         - name: front-end
           image: nginx
           imagePullPolicy: IfNotPresent
           ports:
             - containerPort: 80
- service.yaml
apiVersion: v1
kind: Service
metadata:
  name: my-nginx
  labels:
    app: web
spec:
  ports:
  - port: 8080
    targetPort: 80
    protocol: TCP
  selector:
    app: web
- 依次 apply
kubectl apply -f deployment.yaml
kubectl apply -f deployment2.yaml
kubectl apply -f service.yaml
- 启动效果如下
linyouquan@linyouquan-master:~$ kubectl get pods -o wide
NAME                     READY   STATUS    RESTARTS   AGE   IP            NODE                 NOMINATED NODE   READINESS GATES
test-86598b4587-7gll2    1/1     Running   0          17m   10.244.2.36   linyouquan-worker1   <none>           <none>
test-86598b4587-rfbc7    1/1     Running   0          17m   10.244.1.77   linyouquan-worker2   <none>           <none>
test2-86598b4587-rxl6q   1/1     Running   0          17m   10.244.1.75   linyouquan-worker2   <none>           <none>
test2-86598b4587-tp45z   1/1     Running   0          17m   10.244.1.76   linyouquan-worker2   <none>           <none>
linyouquan@linyouquan-master:~$ kubectl get service -o wide
NAME         TYPE        CLUSTER-IP      EXTERNAL-IP   PORT(S)    AGE   SELECTOR
kubernetes   ClusterIP   10.96.0.1       <none>        443/TCP    14d   <none>
my-nginx     ClusterIP   10.100.68.242   <none>        8080/TCP   22s   app=web
通过 pod ip 访问 nginx
- 找一台 linyouquan-worker1 的实例
linyouquan@linyouquan-master:~$ curl 10.244.2.36
<!DOCTYPE html>
<html>
<head>
<title>Welcome to nginx!</title>
<style>
html { color-scheme: light dark; }
body { width: 35em; margin: 0 auto;
font-family: Tahoma, Verdana, Arial, sans-serif; }
</style>
</head>
<body>
<h1>Welcome to nginx!</h1>
<p>If you see this page, the nginx web server is successfully installed and
working. Further configuration is required.</p>

<p>For online documentation and support please refer to
<a href="http://nginx.org/">nginx.org</a>.<br/>
Commercial support is available at
<a href="http://nginx.com/">nginx.com</a>.</p>

<p><em>Thank you for using nginx.</em></p>
</body>
</html>
- 找一台 linyouquan-worker2 的实例
linyouquan@linyouquan-master:~$ curl 10.244.1.77
<!DOCTYPE html>
<html>
<head>
<title>Welcome to nginx!</title>
<style>
html { color-scheme: light dark; }
body { width: 35em; margin: 0 auto;
font-family: Tahoma, Verdana, Arial, sans-serif; }
</style>
</head>
<body>
<h1>Welcome to nginx!</h1>
<p>If you see this page, the nginx web server is successfully installed and
working. Further configuration is required.</p>

<p>For online documentation and support please refer to
<a href="http://nginx.org/">nginx.org</a>.<br/>
Commercial support is available at
<a href="http://nginx.com/">nginx.com</a>.</p>

<p><em>Thank you for using nginx.</em></p>
</body>
</html>
通过 cluster ip 访问 nginx
cluster ip 虽然无法 Ping 通,但服务可以正常访问
linyouquan@linyouquan-master:~$ curl 10.100.68.242:8080
<!DOCTYPE html>
<html>
<head>
<title>Welcome to nginx!</title>
<style>
html { color-scheme: light dark; }
body { width: 35em; margin: 0 auto;
font-family: Tahoma, Verdana, Arial, sans-serif; }
</style>
</head>
<body>
<h1>Welcome to nginx!</h1>
<p>If you see this page, the nginx web server is successfully installed and
working. Further configuration is required.</p>

<p>For online documentation and support please refer to
<a href="http://nginx.org/">nginx.org</a>.<br/>
Commercial support is available at
<a href="http://nginx.com/">nginx.com</a>.</p>

<p><em>Thank you for using nginx.</em></p>
</body>
</html>
cluster ip 底层实现
- kube-proxy 是 Kubernetes 的核心组件,部署在每个 Nod e节点上,它是实现 Kubernetes Service 的通信与负载均衡机制的重要组件; kube-proxy 负责为 Pod 创建代理服务,从 apiserver 获取所有 server 信息,并根据 server 信息创建代理服务,实现 server 到 Pod 的请求路由和转发,从而实现 K8s 层级的虚拟转发网络。
- kube-proxy 提供三种模式:userspace (Kubernetes1.2版本之前)、iptables、ipvs(推荐的),如果不满足 ipvs 时,会自动降为 iptables 模式,本文主要讲的就是 iptables 模式。
数据流

ps: 图片来自 kube-proxy 如何实现流量转发
具体分析
- 查看 iptables 规则
sudo iptables -t nat -nL --line > iptables
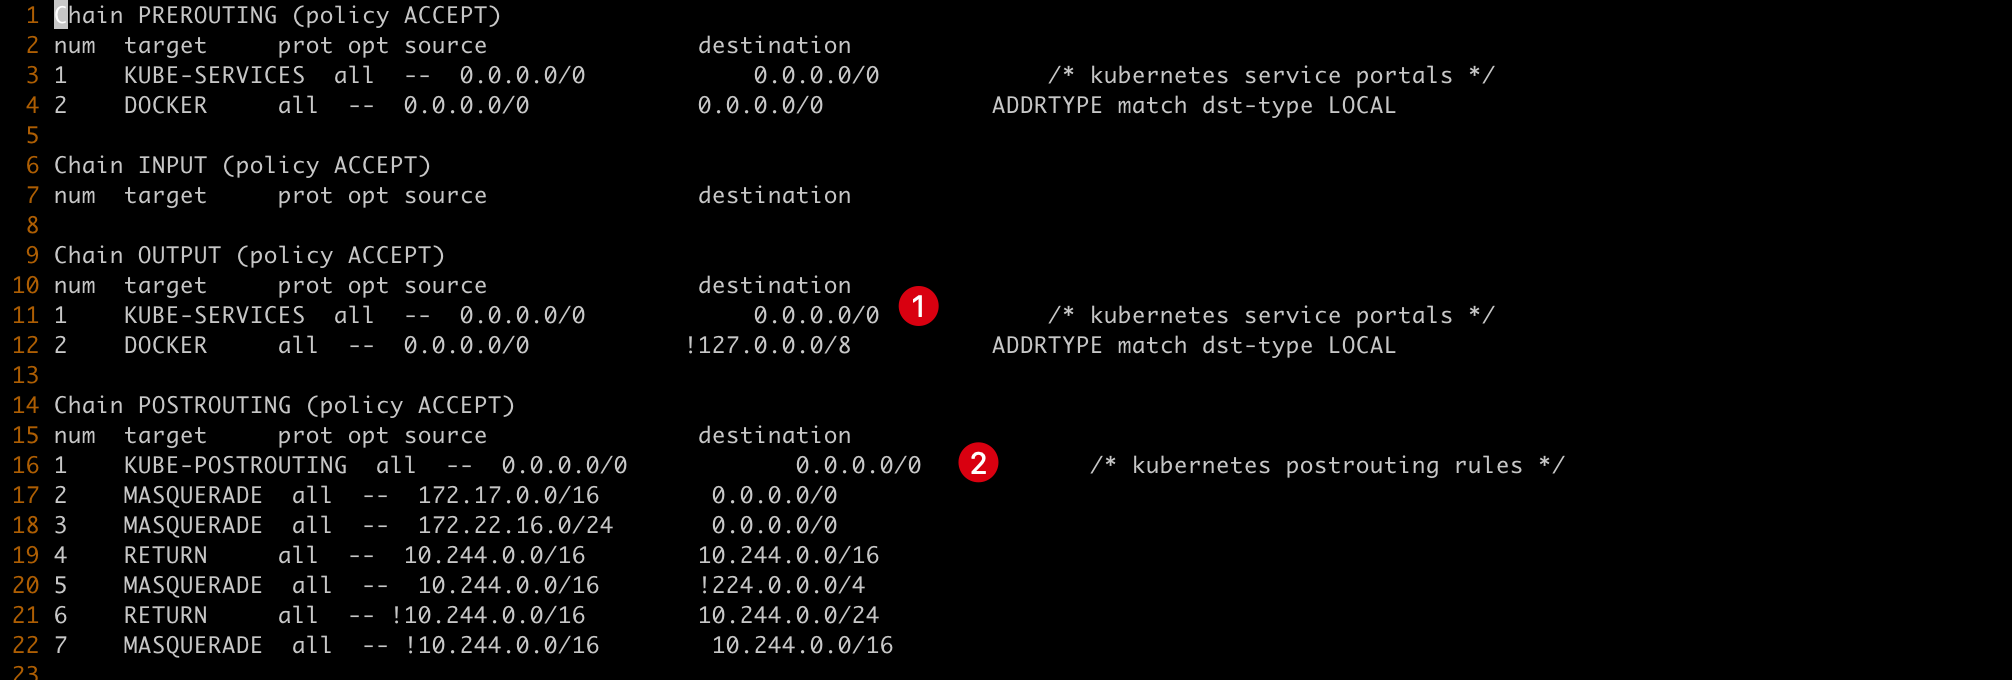
- 由于 kube-proxy 在 iptables 模式下的 ClusterIP 只是单主机可见,所以只能在集群中的某一个节点(只要是集群中的节点即可)上面或者 Pod 中访问这些集群 IP(Cluster IP), 它的数据流是出访数据流,数据优先从 OUTPUT 链出访(对应下图的1)
- 所有访问 Cluster IP 的源 IP,如果源 IP 不是 Pod IP 段,一律进行打标记
--set-xmark 0x4000/0x4000(结合sudo iptables-save -t nat | grep -i KUBE-MARK-MASQ查看),然后继续匹配下一条规则;如果源 IP 是 Pod IP 段,会使用 iptables 的 random 模块均等的分发流量
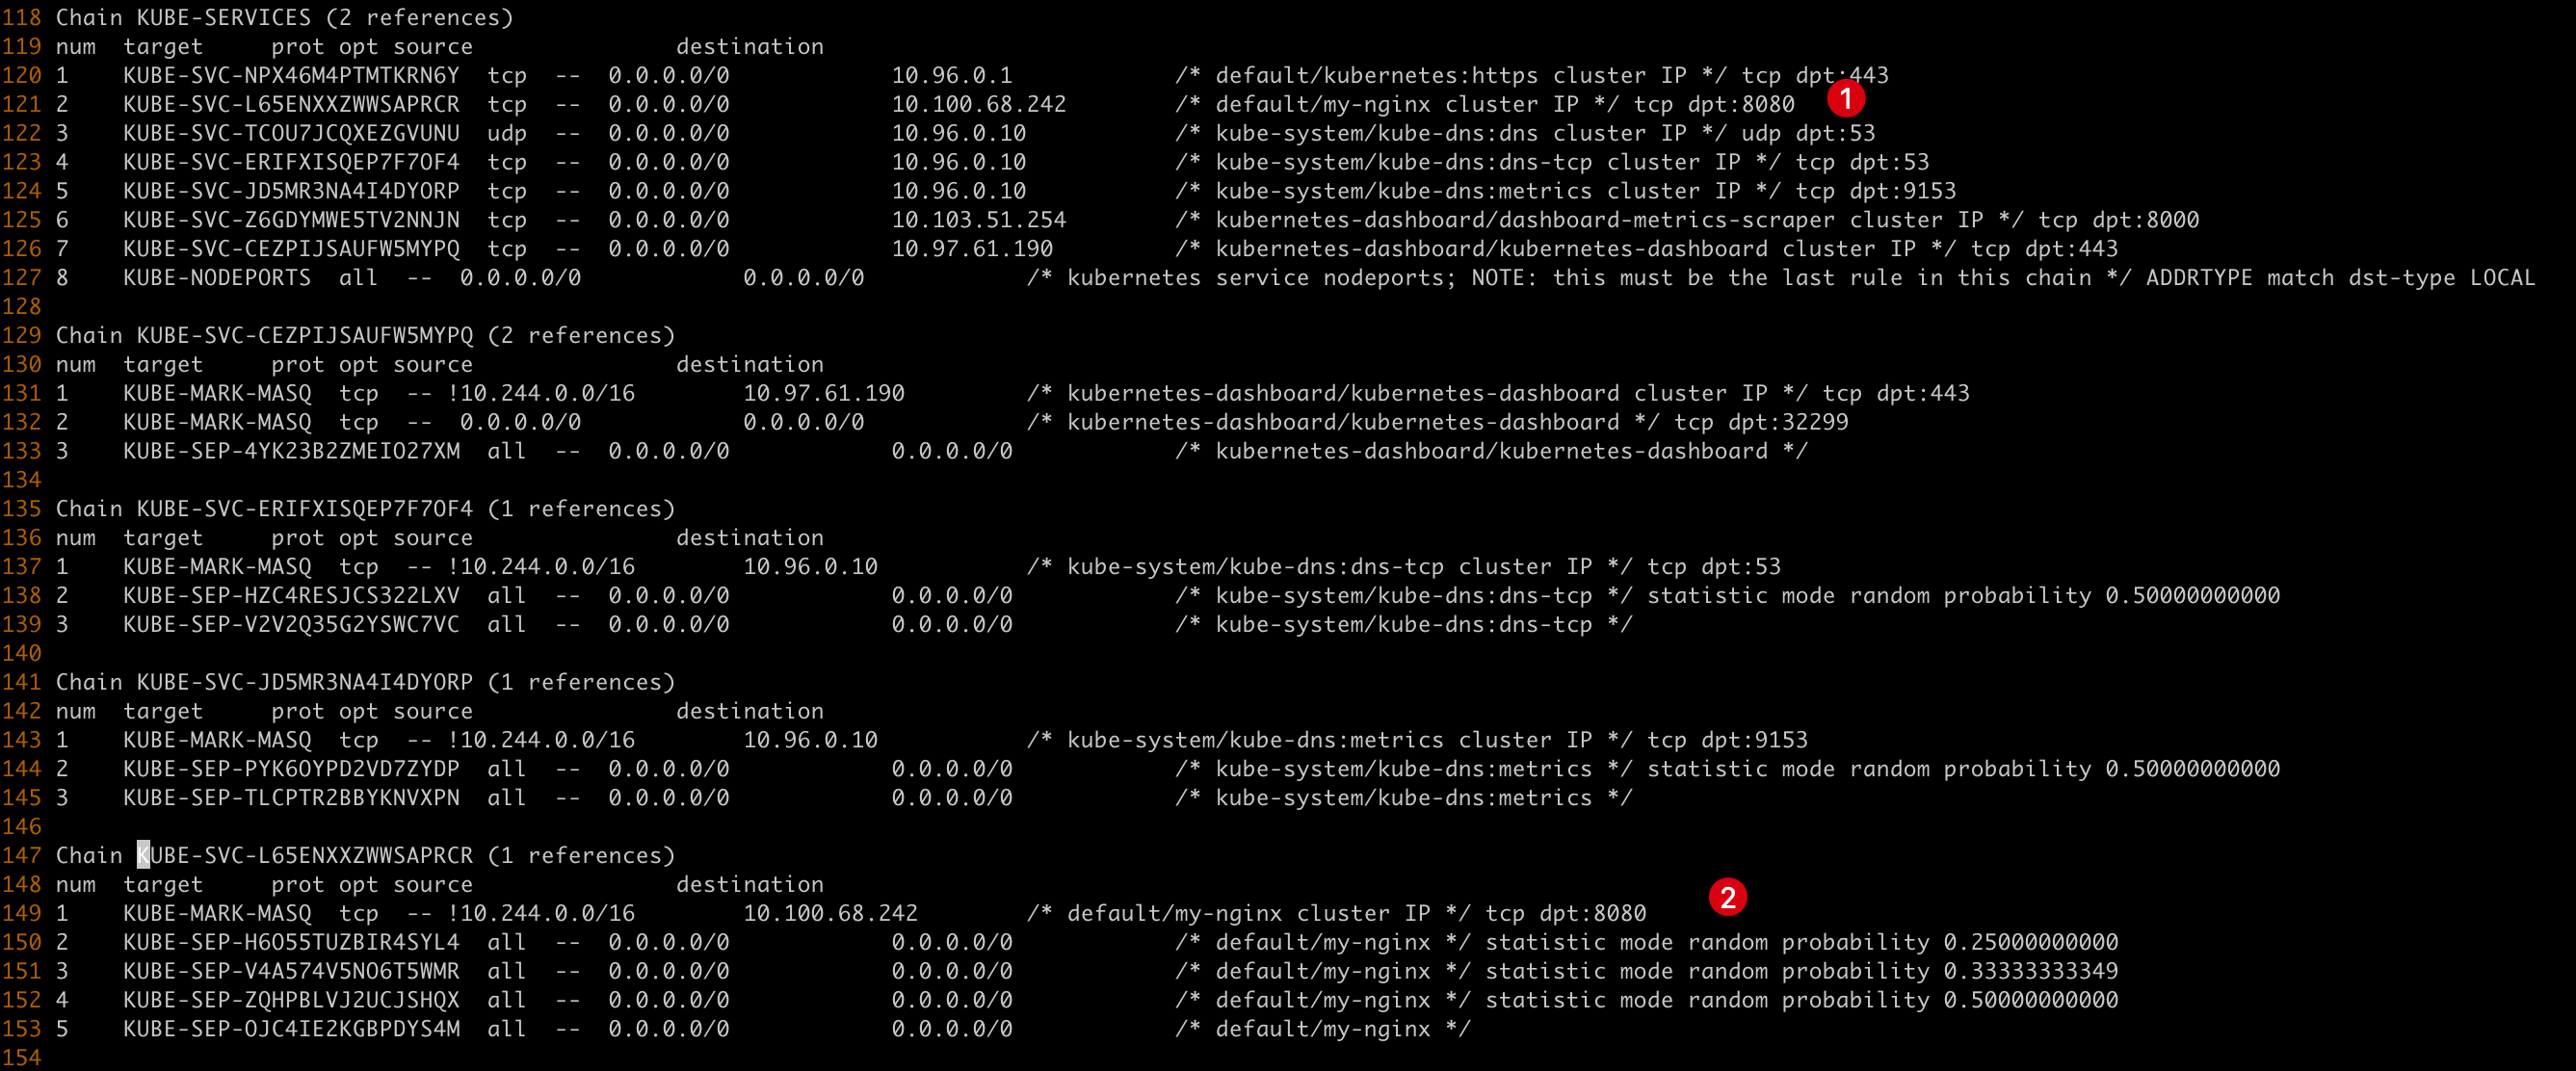
Chain KUBE-MARK-MASQ (21 references)
num  target     prot opt source               destination
1    MARK       all  --  0.0.0.0/0            0.0.0.0/0            MARK or 0x4000
Chain KUBE-SEP-H6O55TUZBIR4SYL4 (1 references)
num  target     prot opt source               destination
1    KUBE-MARK-MASQ  all  --  10.244.1.75          0.0.0.0/0            /* default/my-nginx */
2    DNAT       tcp  --  0.0.0.0/0            0.0.0.0/0            /* default/my-nginx */ tcp to:10.244.1.75:80
Chain KUBE-SEP-V4A574V5NO6T5WMR (1 references)
num  target     prot opt source               destination
1    KUBE-MARK-MASQ  all  --  10.244.1.76          0.0.0.0/0            /* default/my-nginx */
2    DNAT       tcp  --  0.0.0.0/0            0.0.0.0/0            /* default/my-nginx */ tcp to:10.244.1.76:80
Chain KUBE-SEP-ZQHPBLVJ2UCJSHQX (1 references)
num  target     prot opt source               destination
1    KUBE-MARK-MASQ  all  --  10.244.1.77          0.0.0.0/0            /* default/my-nginx */
2    DNAT       tcp  --  0.0.0.0/0            0.0.0.0/0            /* default/my-nginx */ tcp to:10.244.1.77:80
Chain KUBE-SEP-OJC4IE2KGBPDYS4M (1 references)
num  target     prot opt source               destination
1    KUBE-MARK-MASQ  all  --  10.244.2.36          0.0.0.0/0            /* default/my-nginx */
2    DNAT       tcp  --  0.0.0.0/0            0.0.0.0/0            /* default/my-nginx */ tcp to:10.244.2.36:80
- 接下来是 POSTROUTING(对应下图的2),只要标记了
0x4000/0x4000的包就一律做 MASQUERADE(SNAT)
Chain KUBE-POSTROUTING (1 references)
num  target     prot opt source               destination
1    RETURN     all  --  0.0.0.0/0            0.0.0.0/0            mark match ! 0x4000/0x4000
2    MARK       all  --  0.0.0.0/0            0.0.0.0/0            MARK xor 0x4000
3    MASQUERADE  all  --  0.0.0.0/0            0.0.0.0/0            /* kubernetes service traffic requiring SNAT */
DNS 访问 service
- kubeadm 部署时会默认安装 kube-dns 组件。
linyouquan@linyouquan-master:~$ kubectl get deployment --namespace=kube-system
NAME      READY   UP-TO-DATE   AVAILABLE   AGE
coredns   2/2     2            2           14d
- kube-dns 是一个 DNS 服务器。每当有新的 Service 被创建,kube-dns 会添加该 Service 的 DNS 记录。Cluster 中的 Pod 可以通过 <SERVICE_NAME>.<NAMESPACE_NAME> 访问 Service。例如:
linyouquan@linyouquan-master:~$ kubectl run busybox1 --rm -it --image=busybox /bin/sh --overrides='{"apiVersion": "v1", "spec": {"nodeSelector": { "kubernetes.io/hostname": "linyouquan-worker1" }}}'
If you don't see a command prompt, try pressing enter.
/ # wget my-nginx.default:8080
Connecting to my-nginx.default:8080 (10.100.68.242:8080)
saving to 'index.html'
index.html           100% |**************************************************************************************************************************************************************************************************************|   615  0:00:00 ETA
'index.html' saved
/ # cat index.html
<!DOCTYPE html>
<html>
<head>
<title>Welcome to nginx!</title>
<style>
html { color-scheme: light dark; }
body { width: 35em; margin: 0 auto;
font-family: Tahoma, Verdana, Arial, sans-serif; }
</style>
</head>
<body>
<h1>Welcome to nginx!</h1>
<p>If you see this page, the nginx web server is successfully installed and
working. Further configuration is required.</p>

<p>For online documentation and support please refer to
<a href="http://nginx.org/">nginx.org</a>.<br/>
Commercial support is available at
<a href="http://nginx.com/">nginx.com</a>.</p>

<p><em>Thank you for using nginx.</em></p>
</body>
</html>
/ #
外网如何访问 service
cluster ip
前面讲的都是 cluster ip
NodePort
Service 通过 Cluster 节点的静态端口对外提供服务。Cluster 外部可以通过 NodeIP:NodePort 访问 Service。
- 修改 service.yaml,重新 apply
apiVersion: v1
kind: Service
metadata:
  name: my-nginx
  labels:
    app: web
spec:
  type: NodePort
  ports:
  - port: 8080
    targetPort: 80
    protocol: TCP
  selector:
    app: web
- 注意 8080 是 ClusterIP 监听的端口,30392 则是节点上监听的端口。Kubernetes 会从 30000-32767 中分配一个可用的端口,每个节点都会监听此端口并将请求转发给 Service。
linyouquan@linyouquan-master:~$ kubectl get service -o wide
NAME         TYPE        CLUSTER-IP      EXTERNAL-IP   PORT(S)          AGE     SELECTOR
kubernetes   ClusterIP   10.96.0.1       <none>        443/TCP          14d     <none>
my-nginx     NodePort    10.100.68.242   <none>        8080:30392/TCP   5h40m   app=web
- 依次执行下面命令,可以发现都访问成功
curl 192.168.99.13:30392
curl 192.168.99.14:30392
curl 192.168.99.15:30392
LoadBalancer
Service 利用 cloud provider 特有的 load balancer 对外提供服务,cloud provider 负责将 load balancer 的流量导向 Service。目前支持的 cloud provider 有 GCP、AWS、Azur 等。